#Arduino MKR
Explore tagged Tumblr posts
Visit Tumblr Blog
Explore Tumblr blogs with no restrictions, modern design and the best experience.
Last Seen Tumblr Blogs


Fun Fact
Tumblr has been providing a Korean-language service since 2013.
Text
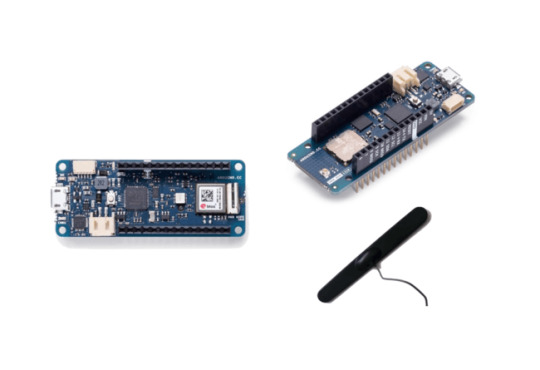
Arduino MKR WIFI 1010

In diesem Beitrag möchte ich dir den Arduino MKR WIFI 1010 vorstellen.

Der Arduino MKR WIFI 1010 ist einer von 9 Mikrocontrollern der Arduino MKR Familie.


Bezug eines Arduino MKR WIFI 1010
Den mir vorliegenden Mikrocontroller habe ich wieder über reichelt.de für 30,10 € zzgl. Versandkosten erstanden. Du bekommst diesen Mikrocontroller jedoch auch in anderen Shops wie nachfolgend aufgelistet. ShopPreisVersandkostenhttps://www.reichelt.de/30,10 €5,95 €https://www.conrad.de/36,99 €4,95 €https://www.thalia.de/37,99 €-https://www.voelkner.de/33,44 €5,95 € Lieferumfang Zum Lieferumfang des Mikrocontrollers gehört noch zusätzlich ein paar Aufkleber sowie ein Garantiezettel.


Technische Daten
Der Mikrocontroller hat nachfolgende technische Daten: Bezeichnung des BoardsArduino® MKR WiFi 1010MikrocontrollerSAMD21 Cortex®-M0+ 32bit low power ARM MCUUSB-AnschlussMicro-USB Built-in LEDD6Anzahl digitale Pins8PWM Pins13 (0-8, 10, 12, A3, A4)Anzahl analoge Eingänge7 (ADC 8/10/12 bit)Anzahl analoge Ausgänge1 (DAC 10 bit)externe Interrupt Pins10 (0, 1, 4 - 9, A1, A2)SchnittstellenBluetooth, WiFiUART, SPI, I²CBetriebsspannung5 V bis 7 Vmax. Stromstärke per GPIO7 mASpannung per GPIO3.3 VLiPo Batterie AnschlussJST PH, LiPo Single Cell, 3.7 V, min. 1024 mAh Abmaße (L x B x H)61,5 mm x 25 mm x 20 mm (mit Pins) In der offiziellen Dokumentation unter https://docs.arduino.cc/hardware/mkr-wifi-1010 findest du weitergehende Informationen zum Mikrocontroller und den Einsatz von diesem.
Programmierung in der Arduino Cloud
Der Mikrocontroller verfügt über eine WiFi-Schnittstelle, mit welcher sich dieser über die Arduino Cloud programmieren lässt. Für die Programmierung über die Arduino Cloud benötigst du zusätzlich das Plugin Arduino Create Agent ein installiertes Plugin sowie den Browser Google Chrome und natürlich einen Account zur Arduino Cloud. Einrichten des Mikrocontrollers in der Arduino Cloud Wenn du in die Arduino Cloud eingeloggt bist, dann navigierst du über Devices > Add und wählst dort den Abschnitt "Arduino" aus. Nachfolgend nun ein kleines YouTube Video. https://youtu.be/rIuItICtSXo
Arduino Oplà & Arduino MKR WiFi 1010
Den Arduino Oplà habe ich dir bereits im gleichnamigen Beitrag Arduino Oplà vorgestellt und auch bereits am Arduino MKR Zero gezeigt, wie dieser programmiert wird. Jedoch gibt der Arduino Oplà sein ganzes Potenzial erst mit der WiFi Funktionalität frei und somit ist der hier vorgestellte Mikrocontroller die erste Wahl für das Modul. Zunächst ein kleines Beispiel mit der Arduino Cloud und den RGB LEDs des Arduino Oplà.

Arduino IoT Cloud - Dashboard zum steuern der RGB LEDs Die RGB LEDs lassen sich aus der Cloud über einen Color Picker steuern. Jedoch ist der Code etwas tricky, denn das Element liefert einen HSV Wert, welcher in ein RGB Wert umgewandelt werden muss. uint32_t getColorFromHSV(CloudColor color){ Color c = Color(color.getValue().hue, color.getValue().sat, color.getValue().bri); byte r; byte g; byte b; c.getRGB(r, g, b); return leds.Color(r, g, b); } Das Programm zum steuern der RGB LEDs aus der Arduino Cloud: #include "thingProperties.h" #include #define NUMPIXELS 5 #define DATAPIN 5 #define CLOCKPIN 4 Adafruit_DotStar leds = Adafruit_DotStar(NUMPIXELS, DATAPIN, CLOCKPIN, DOTSTAR_BGR); void setup() { Serial.begin(9600); delay(1500); initProperties(); ArduinoCloud.begin(ArduinoIoTPreferredConnection); setDebugMessageLevel(2); ArduinoCloud.printDebugInfo(); leds.begin(); leds.setBrightness(5); } void loop() { ArduinoCloud.update(); } uint32_t getColorFromHSV(CloudColor color){ Color c = Color(color.getValue().hue, color.getValue().sat, color.getValue().bri); byte r; byte g; byte b; c.getRGB(r, g, b); return leds.Color(r, g, b); } void setPixelColor(int index, CloudColor color){ leds.setPixelColor(index, getColorFromHSV(color)); leds.show(); } void onLed1Change() { setPixelColor(0, led1); } void onLed2Change() { setPixelColor(1, led2); } void onLed3Change() { setPixelColor(2, led3); } void onLed4Change() { setPixelColor(3, led4); } void onLed5Change() { setPixelColor(4, led5); } Funktionen aus der Datei thingProperties.h #include #include const char SSID = SECRET_SSID; // Network SSID (name) const char PASS = SECRET_OPTIONAL_PASS; // Network password (use for WPA, or use as key for WEP) void onLed1Change(); void onLed2Change(); void onLed3Change(); void onLed4Change(); void onLed5Change(); CloudColor led1; CloudColor led2; CloudColor led3; CloudColor led4; CloudColor led5; void initProperties(){ ArduinoCloud.addProperty(led1, READWRITE, ON_CHANGE, onLed1Change); ArduinoCloud.addProperty(led2, READWRITE, ON_CHANGE, onLed2Change); ArduinoCloud.addProperty(led3, READWRITE, ON_CHANGE, onLed3Change); ArduinoCloud.addProperty(led4, READWRITE, ON_CHANGE, onLed4Change); ArduinoCloud.addProperty(led5, READWRITE, ON_CHANGE, onLed5Change); } WiFiConnectionHandler ArduinoIoTPreferredConnection(SSID, PASS); Read the full article
1 note
·
View note
Text
How to Choose the Right Arduino Board for Your DIY Electronics

Arduino boards are at the heart of many DIY electronics projects. They are popular with hobbyists, students, and anyone who enjoys building things. If you’re new to Arduino or just unsure which board to pick for your project, this guide will help you choose the right one. With many options out there, it’s important to find the board that best fits your needs.
What is Arduino?
Before we dive into choosing a board, let’s quickly go over what an Arduino is. Arduino is an open-source platform made up of hardware and software that allows you to build electronics easily. It includes a microcontroller, which controls the board, and pins to connect sensors, motors, lights, and other parts. Many people use Arduino for prototyping, automation, and interactive projects because it’s simple to use and has a large community to help.
Things to Consider When Choosing an Arduino Board
1. How Complex is Your Project?
The complexity of your project plays a big role in choosing the best Arduino board. Some projects may need only basic functions, while others require more power or special features. Here’s a guide based on project complexity:
Simple Projects: If you’re working on basic tasks like blinking an LED, reading a temperature sensor, or turning on a light, boards like the Arduino Uno or Arduino Nano will work well. These boards are powerful enough for simple tasks.
Intermediate Projects: For projects that need to control motors, handle multiple sensors, or need more memory, you might want to choose a board like the Arduino Mega or Arduino Due. These boards have more pins and are more powerful, making them better for more complex tasks.
Advanced Projects: For projects that require lots of power, such as robotics or systems that need to process data quickly, you should look at boards like the Arduino Zero or Arduino MKR series. These boards offer more processing power and additional features for advanced projects.
2. Size and Shape of the Board
If your project has space limitations, the size of the Arduino board can be an important factor. Some projects need compact boards, while others can handle bigger ones. Here’s a look at some sizes:
Arduino Uno: It’s not the smallest, but it’s a good middle-ground between size and functionality. It’s about 68.6 x 53.4 mm.
Arduino Nano: If space is tight, the Arduino Nano is a smaller option at 45 x 18 mm. It’s great for small projects where you still need basic features.
Arduino Pro Mini: For projects that need an even smaller board, the Arduino Pro Mini is a tiny option, great for things like wearable electronics or embedded systems.
Arduino MKR Boards: The MKR series offers a good balance of size and power, especially if you need features like wireless communication for IoT projects.
3. Number of Pins and Connectivity
The number of pins on your Arduino board determines how many things you can connect to it—like sensors, motors, and other components. Simpler projects don’t need many pins, but more complicated ones will.
Arduino Uno: It has 14 digital I/O pins and 6 analog pins, which is enough for most basic projects.
Arduino Mega: If you need lots of pins, the Arduino Mega is the best choice. It offers 54 digital I/O pins, 16 analog inputs, and 4 UARTs, making it perfect for larger projects like robots or projects with multiple sensors.
Arduino Nano: The Nano has 14 digital I/O pins and 8 analog pins. It’s similar to the Uno but much smaller.
Arduino MKR Boards: These boards usually have additional connectivity options like Wi-Fi and Bluetooth, making them ideal for remote or wireless projects.
4. Power Requirements
Consider how you’ll power your project. Some boards can be powered through USB, while others may need a battery or an external power supply.
Arduino Uno: This board can be powered through USB or an external 9V battery or power supply, making it flexible for both stationary and mobile projects.
Arduino Nano: The Nano can be powered through a mini-USB connection or a 5V source. It's a great choice for small projects where power options are limited.
Arduino MKR Boards: Some MKR boards include a Li-Po battery charger, which is useful for battery-operated projects. If you want a board that can run on batteries for a long time, a MKR board might be the right choice.
5. Wireless Features
If your project needs wireless features like Wi-Fi or Bluetooth, you’ll want to choose an Arduino board that supports these functions. Many Arduino boards now come with built-in wireless capabilities, perfect for IoT (Internet of Things) projects.
Arduino MKR WiFi 1010: This board has both Wi-Fi and Bluetooth, which is great for wireless projects. It’s also compatible with the Arduino IoT Cloud, allowing you to control your devices from anywhere.
Arduino MKR GSM 1400: If you need to use mobile networks, this board has GSM/3G support, which is perfect for remote projects.
Arduino Nano 33 IoT: This board offers both Wi-Fi and Bluetooth in a small size, making it ideal for IoT projects that need compactness and wireless features.
6. Community Support
Arduino is known for its active and helpful community, which can be a big help, especially if you’re new to electronics. The most popular boards, like the Arduino Uno and Arduino Nano, have tons of tutorials, guides, and support available online. This makes it easier to get started and find solutions when you need help.
Additionally, consider looking at the availability of shields (extra boards that plug into your Arduino to add features). Popular boards often have many shields available, making it easier to expand your project without doing a lot of extra work.
7. Cost
Finally, think about your budget. While basic boards like the Arduino Uno are inexpensive, advanced boards like the Arduino Zero or MKR series can be more expensive. If you’re on a budget, you can also consider buying clone boards, which offer similar functions at a lower price.
Conclusion
Choosing the right Arduino board for your DIY electronics project depends on a few key factors, including how complex your project is, the size of the board, how many pins you need, power requirements, and whether you need wireless features. For simpler projects, the Arduino Uno or Arduino Nano should be enough. For more complex projects, consider the Arduino Mega or Arduino Due. If you need wireless communication, the Arduino MKR series is a great option.
Once you pick the right board for your needs, you’ll be ready to bring your project to life with the help of the Arduino platform. Whether you’re building a simple light control system or a robot, the right board will make your project easier and more fun to complete.
1 note
·
View note
Text
Arduino Projects
The open-source electronics platform Arduino is built on user-friendly hardware and software. Using the Arduino Integrated Development Environment (IDE), microcontroller boards can be programmed. Users can connect with a variety of sensors, actuators, and other electrical components thanks to the digital and analog input/output (I/O) pins on these boards.
Popular Arduino boards include:
Arduino Uno
Arduino Nano
Arduino Mega
Arduino Leonardo
Arduino MKR series
Why Choose Arduino for Your Projects?
User-Friendly: Arduino is a great option for novices due to its simplicity.
Reasonably priced: The hardware is readily accessible and reasonably priced.
Community Support: A sizable user base offers a wealth of information, forums, and tutorials.
Versatile: Works with many different types of sensors, modules, and parts.
Cross-Platform: Linux, macOS, and Windows can all use the Arduino IDE.
Tips for Successful Arduino Projects
Start Small: Take on easier tasks at first, then work your way up to more difficult ones.
Record Your Work: Make notes about your code, wiring, and troubleshooting procedures.
Learn from the Community: Seek advice and inspiration by participating in forums and online tutorials.
Try new things: Don't be scared to adjust and change projects to fit your demands.
Arduino projects are a great way to learn about programming and electronics. Your creativity is the only restriction on the range of options available, from basic LED blinkers to complex home automation systems. Arduino enables creators to realize their ideas through its user-friendly platform and extensive community support. Get an Arduino board, look through the available information, and begin creating your next fascinating project right now!
To know more, click here.
0 notes
Text
Arduino Kategorisinde Ucuz ürünler Robocombo'da
Robocombo.com'daki Arduino Kategorileri
Robocombo.com, Arduino ile ilgili çeşitli ürün ve kitler sunmaktadır. Aşağıda, sitedeki bazı önemli kategorileri ve ürünleri özetledim:
1. Arduino Kitleri
Robocombo Arduino Super Combo 4WD Car Kit: Bu kit, 4 tekerlekli bir araç oluşturmak için gerekli tüm parçaları içerir. Bluetooth bağlantısı ile uzaktan kontrol edilebilir.
Yüzlerce robot kitleri: Farklı robot projeleri için çeşitli kitler mevcuttur. Bu kitler, STEM eğitimine yönelik olarak tasarlanmıştır.
2. Arduino Bileşenleri
Arduino Çeşitleri:
Arduino Uno
Arduino Nano
Arduino Leonardo
Arduino 101
Arduino Micro
Arduino Nano Every
Arduino MKR2UNO
Arduino MKR Zero
Bu çeşitler, farklı projeler için uygun olan çeşitli özelliklere sahiptir.
3. Ekran ve Giriş Aletleri
3.5'' TFT LCD Touch Screen: Arduino Mega ile uyumlu olan bu dokunmatik ekran, projelerde görsel arayüz oluşturmak için kullanılabilir.
4. Elektrik ve Güç Kaynağı
Güç Kaynağı Sorunları: Kullanıcılar, projelerinde karşılaştıkları güç kaynağı sorunları hakkında bilgi paylaşmaktadır. Örneğin, 9V pil kullanımı ve alternatif güç kaynakları hakkında tartışmalar mevcuttur.
5. Eğitim ve Proje Rehberleri
İlk Proje Rehberleri: Arduino ile ilk projelerinizi nasıl başlatacağınız hakkında bilgiler ve örnekler sunulmaktadır.
Gelişmiş Kod Projeleri: Daha karmaşık projeler için kod örnekleri ve açıklamalar bulunmaktadır.
6. Sıkça Sorulan Sorular
Kullanıcılar, projelerinde karşılaştıkları sorunlar hakkında sıkça sorulan sorulara yanıt aramaktadır. Örneğin, motorların çalışmaması veya sensörlerin doğru çalışmaması gibi konular üzerinde durulmaktadır.
7. Direnç ve Diğer Bileşenler
Direnç Setleri: Arduino projelerinde kullanılabilecek çeşitli dirençler ve diğer bileşenler mevcuttur.
Sonuç
Robocombo.com, Arduino ile ilgili geniş bir ürün yelpazesi sunarak, hem yeni başlayanlar hem de deneyimli kullanıcılar için çeşitli kaynaklar sağlamaktadır. Kullanıcılar, projeleri için gerekli olan kitleri ve bileşenleri kolayca bulabilir ve eğitim materyallerine erişebilirler. Daha fazla bilgi için siteyi ziyaret edebilirsiniz.
1 note
·
View note
Photo

Monitoring the weather with an Arduino MKR WiFi 1010-based station
0 notes
Text
.Actie - KPN biedt wereldwijde connectiviteit voor elk apparaat. Zo bouw je dit zelf.
Internet of Things (iot) is overal aanwezig. Apparaten worden steeds zelfstandiger en kunnen slimmer worden gebruikt. Denk aan sensoren die informatie geven over de omstandigheden op een locatie, maar ook aan toepassingen als tracken en tracen, of het afhandelen van een betaling op locatie. Jij kunt kans maken op de Arduino MKR WAN 1300 met de KPN IoT Starterkit om er zelf mee aan de slag te gaan. Lees dus snel verder. http://dlvr.it/SzMS6T
0 notes
Text
My Programming Projects and Progress in 2020
My Programming Projects and Progress in 2020 #python #adafruit #circuitplaygroundexpress #Unity #gamedevtv #circuitpython #git
Back in 2019, when I did my programming retrospective I made a few predictions. How did those go? Work on my Extra Life Donation Tracker? Yup! See below!Write more C++ thanks to Arduino? Not so much. C# thanks to Unity? Yes, but not in the way I thought. I only did minor work on my game, but I did start a new GameDev.tv class.Learning Ruby? Well, I wouldn’t necessarily say I learned Ruby. I did…
View On WordPress
#Advent of Code#Arduino#Arduino MKR#btrfs#C#C++#Circuit Playground Express#CircuitPython#electronics#ESP32-S2#Game Development#Impractical Python#Matrix#Matrix-nio#Micfrosoft MakeCode#MS Makecode#Podman#Python Morsels#raspberry pi#raspberry pi zero w#Ruby#Scratch#Unity
0 notes
Text
CircuitPython on Arduino MRKZero
Arduino 보드로 CircuitPython 을 활용해 보기 위해 일단 개발 환경을 설정해��� 하는데, 관련 내용을 정리해 둔 페이지를 일단 keep!!

how to install CircuitPython on a variety of SAMD21-based boards
https://learn.adafruit.com/installing-circuitpython-on-samd21-boards/overview
The easiest method for installing CircuitPython is through the UF2 bootloader. UF2 is a slick piece of code that runs on your microcontroller, and it allows the board to appear as a drive on your computer. From there, you can simply drag-and-drop the CircuitPython installer! We will need to take the following steps to install CircuitPython on a SAMD21 board:
Install Arduino and the appropriate board definition
Download the UF2 bootloader Arduino code for your board
(add link) https://circuitpython.org/board/arduino_mkrzero/
Upload the UF2 bootloader code to your board from Arduino
Download the CircuitPython installer for your board
Copy the CircuitPython installer to your board
Test it!
What is CircuitPython?
https://learn.adafruit.com/welcome-to-circuitpython/what-is-circuitpython
0 notes
Video
youtube
Notifiche in App con Blynk e Arduino MKR1010 - video 194
1 note
·
View note
Text
Arduino MKRシリーズ、スイッチサイエンスウェブショップで2021年8⽉6⽇販売開始
Arduino MKRシリーズ、スイッチサイエンスウェブショップで2021年8⽉6⽇販売開始 #ArduinoMKRシリーズ #スイッチサイエンス #Wi-Fi #LoRaWAN #GSM通信 #新製品 #Arduino
これは嬉しい。 LoRaWAN や Wi-Fi 接続に対応した Arduino がスイッチサイエンスで販売開始となっています。 製品は2つに分かれていて、それぞれのお値段も、それほどお高くはない感じですので、これは使えそうな製品ですね。 Arduino MKRシリーズ、スイッチサイエンスウェブショップで2021年8⽉6⽇販売開始 株式会社スイッチサイエンス 株式会社スイッチサイエンス(以下スイッチサイエンス、本社:東京都新宿区、代表取締役:金本茂)は、Arduino Holding社のArduino MKRシリーズを、スイッチサイエンスのウェブショップにて2021年8月6日より販売開始します。 Arduino MKRシリーズ、スイッチサイエンスウェブショップで2021年8⽉6⽇販売開始 ▶︎ 「Arduino MKR WiFi 1010」の特徴 Arduino MKR WiFi…

View On WordPress
0 notes
Text
Arduino MKR IoT Carrier - Fehler Bosch BME68x

In diesem Beitrag möchte ich dir zeigen, wie du den Fehler mit dem Bosch Sensor BME68x am Arduino MKR IoT Carrier lösen kannst.

Arduino MKR IoT Carrier - Probleme mit BME68x Das Arduino MKR IoT Carrier Modul ist auch bekannt unter der Bezeichnung Arduino Oplà.

Arduino MKR IoT Carrier Dieses Modul werde ich dir demnächst auf diesem Blog noch genauer vorstellen, hier soll es nun darum gehen, wie du den Fehler bei der Programmierung bzw. beim Umgang mit der Bibliothek ArduinoMKRIoTCarrier umgehen kannst.
Fehlermeldung
Du erhältst ggf. nachfolgende Fehlermeldung: In file included from c:UsersstefaDocumentsArduinolibrariesArduino_MKRIoTCarriersrc/MKRIoTCarrierDefines.h:12:0, from c:UsersstefaDocumentsArduinolibrariesArduino_MKRIoTCarriersrc/Arduino_MKRIoTCarrier.h:25, from C:UsersstefaAppDataLocalTemp.arduinoIDE-unsaved2023126-16636-55t9uc.o48eqGraphicsGraphics.ino:5: c:UsersstefaDocumentsArduinolibrariesBSEC_Software_Librarysrc/bsec.h:46:10: fatal error: bsec_datatypes.h: No such file or directory #include "bsec_datatypes.h" ^~~~~~~~~~~~~~~~~~ compilation terminated. exit status 1 Compilation error: exit status 1 Hier konnte in der Datei bsec.h in der Zeile 46 der Import nicht aufgelöst werden. Die Datei bsec_datatypes.h existiert schlichtweg nicht im Verzeichnis.
Lösung
Die Lösung ist vielschichtig, zum einen muss die Bibliothek BSEC_Software_Library auf die Version 1.6.1480 herabgestuft werden. Dieses kannst du über den internen Bibliotheksmanager der Arduino IDE machen oder du lädst das Paket als ZIP-Datei vom GitHub Repository boschsensortec / BSEC-Arduino-library.

Downgrade der Version des Bosch Sensors BME68x Den Bibliotheksmanager der Arduino IDE findest du über das Icon auf der linken Seite der IDE (1) dort suchst du zunächst nach "bsec" (2) und wählst aus der Auswahlliste der Versionen die Version 1.6.1480 aus (3) und wählst die Schaltfläche "INSTALL" (4). Wenn die neue Version installiert ist, sollte bei (5) statt der Version 1.7.1492 die gewählte Version 1.6.1480 stehen. Nun kannst du den Quellcode erneut kompilieren und auf deinen Mikrocontroller aufspielen.
Quelle
Die Lösung zu diesem Problem habe ich auf der Seite https://github.com/arduino-libraries/Arduino_MKRIoTCarrier/pull/70 gefunden. In der Lösung wird beschrieben, dass zur klassischen Version der Arduino IDE 1.x gewechselt werden soll. Jedoch konnte ich in der Version 2.0 der Arduino IDE mit dem Downgrade der besagten BSEC Version erfolgreich ein Sketch hochladen. Read the full article
0 notes
Text
Arduino MKRシリーズ、スイッチサイエンスウェブショップで2021年8⽉6⽇販売開始
Arduino MKRシリーズ、スイッチサイエンスウェブショップで2021年8⽉6⽇販売開始 #ArduinoMKRシリーズ #スイッチサイエンス #Wi-Fi #LoRaWAN #GSM通信 #新製品 #Arduino
これは嬉しい。 LoRaWAN や Wi-Fi 接続に対応した Arduino がスイッチサイエンスで販売開始となっています。 製品は2つに分かれていて、それぞれのお値段も、それほどお高くはない感じですので、これは使えそうな製品ですね。 Arduino MKRシリーズ、スイッチサイエンスウェブショップで2021年8⽉6⽇販売開始 株式会社スイッチサイエンス 株式会社スイッチサイエンス(以下スイッチサイエンス、本社:東京都新宿区、代表取締役:金本茂)は、Arduino Holding社のArduino MKRシリーズを、スイッチサイエンスのウェブショップにて2021年8月6日より販売開始します。 Arduino MKRシリーズ、スイッチサイエンスウェブショップで2021年8⽉6⽇販売開始 ▶︎ 「Arduino MKR WiFi 1010」の特徴 Arduino MKR WiFi…
View On WordPress
0 notes
Text
Tutorial Menggunakan Arduino MKR Wifi 1010 lengkap !
Tutorial Menggunakan Arduino MKR Wifi 1010 lengkap !
Ceritanya saya mendapatkan projek yang menggunakan arduino MKR wifi 1010 dan sama sekali belum pernah saya oprek arduino yang satu ini. arduino mkr wifi 1010 dilengkapi dengan modul wifi dan chip bawaan SAMD21 keluarga ARM. untuk sepeknya bisa baca selengkapnya di https://store.arduino.cc/usa/mkr-wifi-1010 Harga nya lumayan mahal, di halaman resmi arduino .cc saja tercantum $32.10 mungkin kalo…

View On WordPress
0 notes
Text
MKR WAN 1310: Arduino apresenta uma nova placa com conectividade LoRa!
MKR WAN 1310: Arduino apresenta uma nova placa com conectividade LoRa!
A placa MKR WAN 1310 é de apenas 67,6 x 25,0 mm e integra um processador ARM Cortex M0 +. O MKR WAN 1310 já está disponível para pedidos por € 33 (~ US $ 37). A placa de 67,6 x 25,0 mm pesa 32 g e é equipada com um SoC Microchip Atmel SAMD21 que integra um processador ARM Cortex M0 +. O MKR WAN 1310 é mais eficiente que seus antecessores, graças às suas arquiteturas de carga e energia…
View On WordPress
0 notes
Photo

Arduino MKR Wi-Fi 1010 IOT Board-A Complete Information and Guide for User - Robu.in | Indian Online Store | RC Hobby
0 notes
Text
adv: KPN biedt wereldwijde connectiviteit voor elk apparaat. Zo bouw je dit zelf!
Dit artikel wordt je aangeboden door KPN IoT Internet of Things (IoT) is overal om ons heen. Apparaten worden steeds zelfstandiger en kunnen slimmer gebruikt worden. Denk aan sensoren die informatie geven over de omstandigheden op een locatie, maar ook toepassingen als het tracken en tracen of het afhandelen van een betaling op locatie. En het leuke is: jij kunt kans maken op de Arduino MKR WAN 1300 samen met de KPN IoT Starterkit om er zelf mee aan de slag te gaan. Lees dus snel verder. Gr... http://dlvr.it/SzM7hd
0 notes